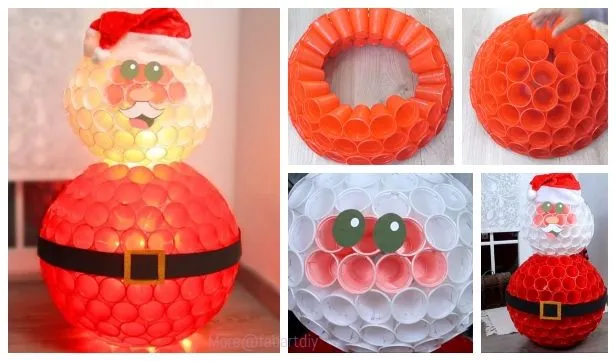
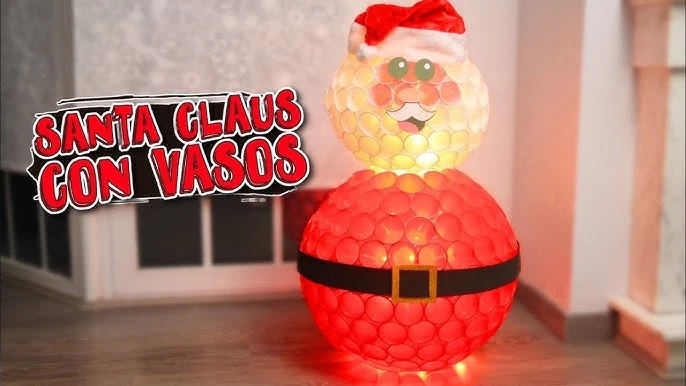
Bring some holiday cheer to your home with a glowing DIY Santa made from plastic cups! This easy and inexpensive craft is perfect for Christmas and is a great activity for families or classrooms. With just a few materials, you can create a charming, illuminated Santa Claus that will brighten up any holiday display. Here’s how to make your own plastic cup Santa light step-by-step.
Why Make a Plastic Cup Santa Light?
This DIY Santa light is a unique holiday decoration that’s easy to make, budget-friendly, and highly customizable. It’s also a great way to upcycle plastic cups, transforming them into a festive piece. Not only will you have a charming Christmas decoration, but you’ll also feel great knowing you created it yourself. Plus, this light-up Santa can make an eye-catching centerpiece or window decoration.
Materials Needed
For this DIY Santa, gather the following materials:
- Plastic cups (about 100-200 red and white 6 oz. cups)
- Stapler or hot glue gun (for securing the cups together)
- Black and gold construction paper (for Santa’s belt and buckle)
- Red felt or construction paper (for Santa’s hat)
- Battery-operated string lights or LED bulbs (to place inside and make it glow)
- Green and white construction paper (for Santa’s eyes and beard)
- Scissors and markers for decoration
Step-by-Step Guide to Making a Plastic Cup Santa Light
Step 1: Prepare the Cups
Decide on the layout for your Santa. The red cups will form Santa’s body and hat, while the white cups will create his face and beard. Organize the cups by color to make the assembly process easier.
Step 2: Build Santa’s Body
- Create the Base Layer: Start by forming a circular base with the red cups. Staple or hot glue each cup together at the edges in a round shape. This base will be the bottom of Santa’s body.
- Layer the Cups: Continue stacking and securing additional layers of red cups on top of each other, slightly decreasing the size with each new layer to form a dome shape. This will make Santa’s body look round and give it a 3D appearance.
Step 3: Build Santa’s Head
- Form the Head Shape: Using the white cups, start forming a smaller dome shape for Santa’s head. The head should be about half the size of the body.
- Add Santa’s Face: Once the dome for the head is complete, cut out green and black circles for the eyes and a pink or red circle for Santa’s nose. Attach them to the cups on the front of Santa’s face.
Step 4: Add Lights Inside
Before attaching the head to the body, insert battery-operated string lights or LED bulbs inside both the body and head sections. Be sure to position them evenly to create a consistent glow throughout Santa’s body and head. Make sure the battery pack is easily accessible for turning the lights on and off.
Step 5: Attach the Head to the Body
Carefully attach the white head dome on top of the red body using a stapler or hot glue gun. Ensure it’s securely fastened so it holds together when standing.
Step 6: Add Santa’s Accessories
- Create the Belt: Use black construction paper to make a belt that wraps around Santa’s body. Attach it just below where the head meets the body.
- Make the Buckle: Cut out a square from gold construction paper for the belt buckle and attach it to the center of the black belt.
- Add the Hat: For the final touch, make a Santa hat out of red felt or construction paper. Attach it to the top of Santa’s head and add a white “pom-pom” or cotton ball to the tip.
Displaying Your Plastic Cup Santa Light
Now that your Santa light is complete, find the perfect spot to display it! It looks great in front windows, by the Christmas tree, or on a table as a holiday centerpiece. When the lights are turned on, it will glow beautifully, adding a warm and festive ambiance to your home.
Tips for Customizing Your Plastic Cup Santa Light
- Use different colors of cups for a unique look. You can use glitter spray or add painted accents to make your Santa sparkle.
- Add a Christmas-themed scarf or additional decorations to make your Santa light even more festive.
- Make it interactive by letting kids decorate Santa’s face or choose where to place the lights.
Why This DIY Santa Light is a Great Project
The plastic cup Santa light is a memorable and fun holiday craft. It’s a great way to spend quality time with family, involves easy-to-find materials, and results in a decoration that everyone can admire. This cheerful Santa light-up display is sure to make your home or classroom feel extra cozy and festive!
Conclusion
This DIY Christmas plastic cup Santa light is a fun, budget-friendly project that’s perfect for the holiday season. Not only is it easy to make, but it’s also a fantastic way to upcycle plastic cups and create something special for Christmas. Gather your materials, turn on the lights, and enjoy a bright, festive Santa Claus to celebrate the holiday season!









Leave a Reply
View Comments