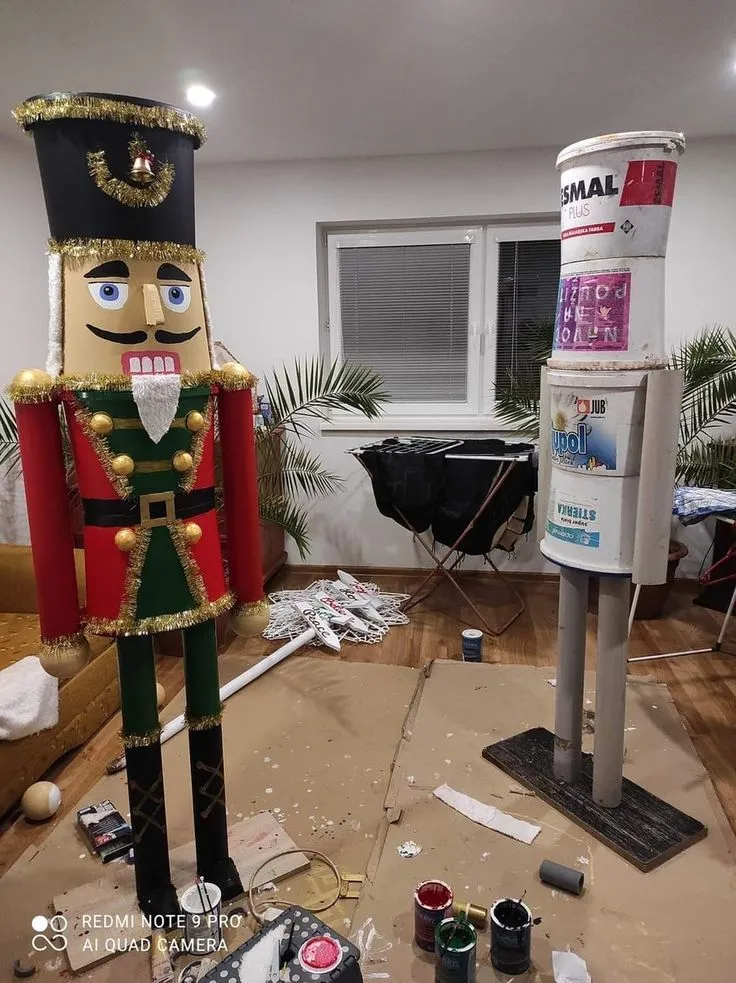
Looking to make a statement with your holiday decor this year? Transform ordinary paint buckets into a stunning, life-sized Nutcracker! This fun and festive DIY project is perfect for adding a unique, handcrafted touch to your holiday decorations, and it’s a great way to upcycle materials. With some creativity and a few art supplies, you can create a show-stopping Nutcracker that’ll impress everyone who visits.

Why Make a Life-Sized Nutcracker?
A life-sized Nutcracker brings a touch of classic holiday magic into your home or outdoor decor. Store-bought Nutcracker decorations can be pricey, so this DIY approach is not only budget-friendly but also customizable. Plus, you’ll be able to reuse it for years to come, making it a perfect project for DIY lovers who enjoy unique, one-of-a-kind creations.
Materials Needed
To bring your DIY Nutcracker to life, gather the following materials:
- Empty paint buckets (two large buckets for the body and head)
- PVC pipes or thick cardboard tubes (for the legs and arms)
- A small bucket or planter (for the hat)
- A hot glue gun and heavy-duty glue (to secure all parts)
- Acrylic paint (red, black, green, and gold for traditional Nutcracker colors)
- Gold tinsel or garland (for decorative trim)
- Foam sheets or construction paper (for facial features and details)
- Additional decorations: bells, ribbon, buttons, etc.
- Paintbrushes and markers (for details)
Step-by-Step Guide to Making a Life-Sized Nutcracker
Step 1: Assemble the Body and Head
- Stack the Buckets: Start by placing one bucket upside down for the Nutcracker’s torso and a second bucket on top for the head.
- Secure the Buckets Together: Use a hot glue gun or heavy-duty adhesive to attach the buckets securely.
Step 2: Create the Legs and Arms
- Attach the Legs: Cut PVC pipes or sturdy cardboard tubes to the desired length for the Nutcracker’s legs. Paint them black and attach them to the bottom of the torso using glue.
- Create Arms: For the arms, cut shorter pieces of PVC pipe or cardboard tubes. Paint these red or gold and attach them to the sides of the torso.
Step 3: Paint the Nutcracker’s Uniform
- Base Coat: Paint the torso red, the head a flesh tone, and add black boots at the bottom of the legs.
- Uniform Details: Add green and gold accents to create the Nutcracker’s coat and decorative trim. Use gold paint to draw buttons, epaulettes, and other uniform details.
- Belt and Buckle: Use black paint to make a belt around the torso and add a gold buckle in the center.
Step 4: Add Facial Features and Hat
- Create the Face: Use foam sheets or construction paper to cut out eyes, a nose, a mustache, and a mouth. Attach them to the head bucket with glue, painting on additional details as needed.
- Make the Hat: Place a small black bucket or planter on top of the head as a hat. You can add gold garland or a bell for a festive touch.
Step 5: Final Touches
- Decorate with Tinsel: Attach gold tinsel around the shoulders, wrists, and hat for a classic Nutcracker look.
- Add Accessories: If you want to take it further, attach a small wooden sword or staff to one hand or add decorative buttons and gems to the uniform for extra flair.
Displaying Your DIY Nutcracker
Your life-sized Nutcracker is now ready to display! Place it by your front door, near your fireplace, or even outside as part of your holiday decor. This project is durable enough to withstand indoor or covered outdoor environments and will surely become a holiday favorite.
Tips for Customizing Your Nutcracker
- Personalize the colors to match your holiday theme. You can go for classic red, black, and gold or try modern colors like silver and white.
- Add holiday lights to make your Nutcracker sparkle at night. Battery-operated fairy lights are easy to wrap around the Nutcracker and add a magical touch.
- Try different sizes: Use smaller buckets to create miniature Nutcrackers for indoor tabletops or holiday centerpieces.
Why This DIY Nutcracker is a Great Project
This life-sized Nutcracker DIY is not only a fun way to add a festive touch to your holiday decor, but it’s also an eco-friendly way to upcycle paint buckets and other materials. The finished Nutcracker has a bold, traditional look that brings instant holiday charm to any setting. Plus, you’ll have the satisfaction of knowing you created it yourself!
Conclusion
Making a life-sized Nutcracker from paint buckets is a fantastic way to celebrate the holiday season with a personal touch. With just a few simple materials, you can create a custom Nutcracker that will bring joy to you and your guests. Gather your materials, get creative, and start building a Nutcracker that will make your holiday decor unforgettable!


Leave a Reply
View Comments